Dual booting Windows 10 and Ubuntu 18.04 on a Dell XPS 13

Probably the best way to dual boot on a Dell XPS 13 is to buy their developer edition with Ubuntu and then install Windows 10 from there. Or you can be like me and buy the Windows version, blithely thinking that getting dual boot going will be as straightforward as it’s ever been.
Ha.
There’s a couple gotcha’s that I stumbled into along the way to successfully installing Ubuntu to dual boot. And I couldn’t find a single resource that put together all the necessary hoops you need to jump through. So here’s a guide to how I managed to pull it off.
Proceed at your own risk.
0. Make Backups
Make a Windows system restore point. The XPS 13 ships with a recovery partition, but you can also create a recovery disk on a USB drive.
I won’t go into the details about how to do backups, there are good resources out there, including the links above. But at a minimum I recommend creating a restore point.
1. Prepare an Ubuntu Boot Disk
First let’s create the media we’ll need in order to install Ubuntu. You’ll need a USB stick with about 2.2 GB free to create an Ubuntu startup disk.
A. Download an Ubuntu ISO
Unfortunately we can’t use the standard Ubuntu ISO,ubuntu-18.04.1-desktop-amd64.iso. I started with that ISO, creating my boot disk with the Ubuntu Startup Disk Creator. However, when I tried that startup disk, I ran into the first gotcha:
Gotcha! Ubuntu 18.04 will only boot properly in Legacy Boot Mode but Windows 10 boots with UEFI not BIOS.
You have to install Ubuntu with UEFI in order to dual boot. But when I tried to boot from my Ubuntu disk with only UEFI enabled, I got the following ominous sounding error:
Failed to load image \EFI\BOOT\mmx64.efi: Not Found
Failed to start MokManager: Not Fond
Something has gone seriously wrong: import_mok_state() failed
The system is searching for an efi file that doesn’t exist. It’s a known problem, and that link contains several work-arounds. The two methods I would recommend are:
Option #1: Modify the ISO yourself
This is not the option I went with, but I’ve read multiple places that copying grubx64.efi and renaming to mmx64.efi should do the trick. Note you must do this before making the start-up disk, because the disk itself is read-only.
Option #2: Use a modified ISO designed for the XPS 13/15
Here you’ll find a tweaked Ubuntu 18.04 installation just for the Dell XPS 15 9570. It also works for me so far with the Dell XPS 13 9380. I stumbled on this repo and I’m so glad I did. I’m sure it’s saved me some headache getting devices like my wifi to play nice with Ubuntu.
B. Create a startup disk
Once you have downloaded your .iso file, you’re ready to make a startup disk.
If you want to make the disk on Windows 10, I suggest this tutorial for how to create a startup disk on a USB with Rufus, a free open source USB writing tool.
I created my disk on another computer running Ubuntu 18.04. Startup Disk Creator is not a general purpose ISO burner and it won’t work with our modified ISO file. So you’ll need other software. I used mkusb.
Here’s how to create the startup disk with mkusb:
-
Launch program and say ‘yes’ to run version dus.

-
Enter your password to give the program sudo permissions and enter ‘Okay’ on welcome screen
-
Select hotkey i: “install (make a boot device)”

-
Select hotkey l: “‘Live-only’ or linux installer from iso file”, and select your iso file

-
Select the USB device

-
Select ‘Go’ to create the startup disk

-
A notice will appear to check the result. In the terminal, you should see a green
Done :-)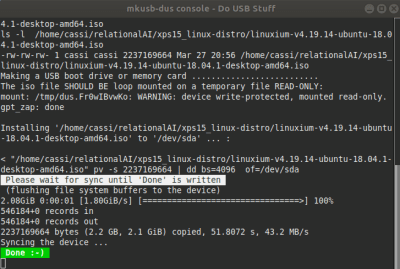
Now you’ve got your USB startup disk. We need to boot from this disk to install Ubuntu. But first, we have to make some changes in Windows and the BIOS setup.
2. Modifications in Windows 10
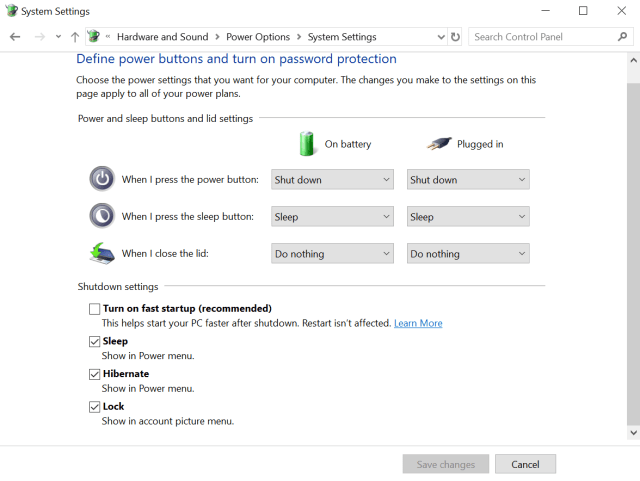
A. Turn off Windows fast startup
Log in to Windows 10 and open the Control Panel. Follow the path:
- Control Panel > Hardware and Sound > Power Options > Change what the power buttons do > Change settings that are currently unavailable.


Uncheck the ‘Turn on fast startup’ box.
B. Re-partition the hard drive
Some space needs to be set aside for an Ubuntu partition and, if desired, a data partition that can be accessed from both Ubuntu and Windows 10.
-
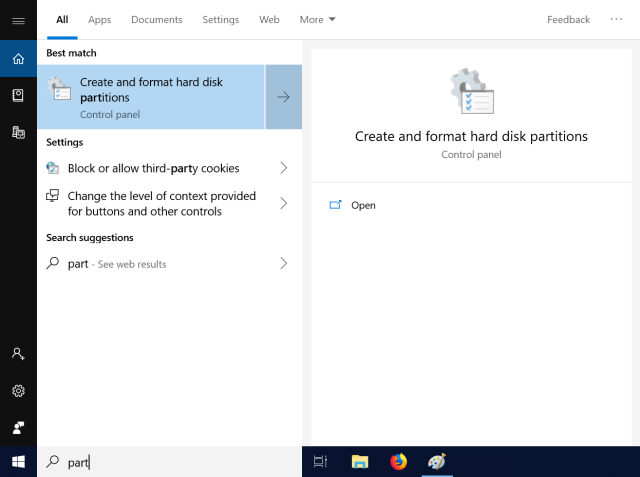
Click the Windows start icon at the bottom left and type “partition”.
-
Click “Create and format hard disk partitions”.
-
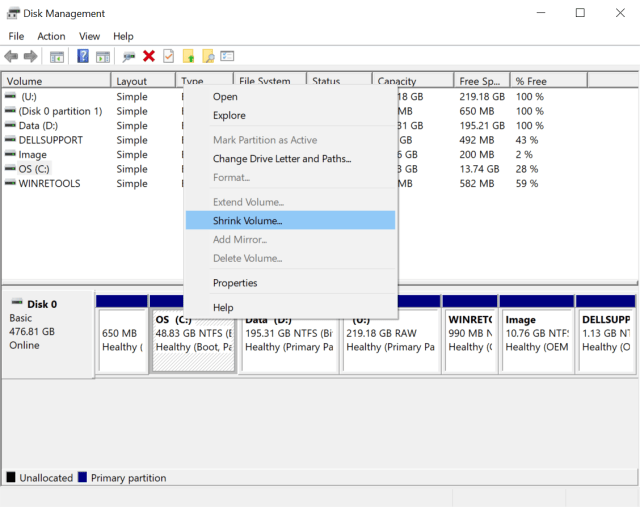
Find your C: drive (here labeled “OS C:”), it should be your largest partition. Right click and select “Shrink Volume…”
Note that the image below was taken after I installed Ubuntu. I didn’t take screenshots beforehand. (And I didn’t know I’d need to make a tutorial at all at that point!) Your “OS C:” partition will be a much larger percentage of the hard disk and you won’t have the “Data (D:)” and “(U:)” partitions that appear here.
-
You’ll be prompted to choose how much to shrink by in MB. As you can see above, I left about 50 GB on my Windows OS partition. (Note that the space listed is always a little smaller than the space you allocate explicitly.) I know I’ll be needing that disk space in Ubuntu more. Choose your partition size based on how much data you’ll need to store on each partition.
-
From the now un-allocated space, you can optionally create a data partition. This partition will be accessible to both Windows and Ubuntu. I created a Data drive (labeled “Data D:” above) with about 200 GB space. To format the Data partition, right click on the un-allocated space and select “Format…”. You’ll be prompted to choose the size and format of your new partition. (Sorry, no pics of this part.)
I chose the NTFS format for my data partition. There’s some security implications for this on the Ubuntu side, so if that’s an issue for you, do your research first. If you’re not sure, you can always reformat the partition later.
I formatted the Ubuntu partition to exFAT, but there’s really no reason to. The Ubuntu installer will handle formatting this area.
3. Modifications to the startup settings
A. Enter the BIOS/UEFI startup settings
Turn off the computer and insert your USB drive. Start the computer and when the Dell logo appears, press F2 (Note: not shift+F2) to enter the startup setup. The screen looks like the image below, with a list of settings on the left side.
B. Modify startup settings
Follow the paths listed here and change settings as indicated:
- General > Boot Sequence: Change boot order (menu on top right) to list your USB drive first. My drive is named Samsung Type-C 1100 and the option for me looked like “UEFI: Samsung Type-C 1100”.
- General > UEFI Boot Path Security: Select “Never”.
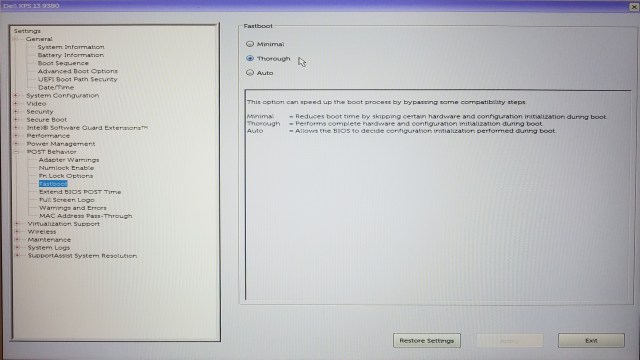
- POST Behavior > Fastboot: Change to “Thorough”. (This is shown in the image above.)
- POST Behavior > Extend BIOS POST Time: Since we’ll need to get back in the BIOS later, it’s useful (but not necessary) to extend this to “5 seconds”.
- Secure Boot: unclick Secure Boot Enable.
- General > Advanced Boot Options: Make sure “Enable legacy option ROMs” is unchecked. Keep “Enable UEFI network stack” checked.
From this point, I started the Ubuntu install, but I ran into another gotcha.
Gotcha! When the SATA operating mode is set to RAID and not AHCI, Ubuntu can’t find your hard drive.
You can try to go directly to Section “4. Install Ubuntu” below, but if you get to step C.5 and can’t find your hard drive, this is probably the problem. To solve it, we need to change one more BIOS setting:
- System Configuration > SATA Operation: Switch from “RAID On” to “AHCI”
Spoiler alert: the corollary to this gotcha is that Windows 10 can’t boot in AHCI mode. We’ll solve that in Section 5.
Once you’ve made all your startup changes, click “Apply” and then “Exit”.
4. Install Ubuntu
Now we’re ready to proceed with the installation. If you’ve followed all the steps above, this part is fairly straightforward.
A. Boot from your USB startup disk
Make sure your USB is inserted. Restart the computer and press F12 when the Dell logo appears. You should be set up to boot from your USB anyway, but this way you can check explicitly. In the boot menu, you should see your USB drive listed as the first option. My screen looked something like this:
UEFI: Samsung Type-C 1100
…
Where “Samsung Type-C 1100” would be replaced by the name of your USB drive.
Select the USB drive and hit enter.
B. Launch Ubuntu installation
Once you boot from your startup disk, you’ll get the option to ‘try’ Ubuntu, or install right away. It doesn’t matter what you select: if you choose to try Ubuntu first, you will see an icon on the desktop that says “Install Ubuntu 18.04 LTS”. Click this icon to initiate the installation.
C. Follow installation instructions
An overview of the installation directions are given below. The images in this section are taken from linuxbsdos.com since I didn’t capture screenshots of this part myself. If you have installed Ubuntu before, this part should be straightforward. Other good installation guides can be found here and here. They don’t include all the background you need to get to this point, but they do a good job guiding you through the installation process itself.
-
Choose your language and keyboard preferences.
-
Connect to a network.
-
Select Normal Installation. I also checked “Download updates while installing Ubuntu” and “Install third-party software […]”
Note: You need an internet connection to check “Download updates […]” otherwise it will be greyed out. If you are prompted for a password when you check “Install third-party software […]” then you probably did not disable Secure Boot in your startup settings. (See 3B. Modify startup settings.)
-
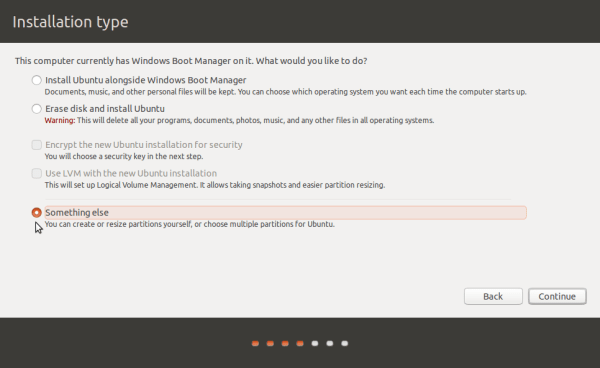
On the “Installation type” screen, select the last option: “Something else”.
-
You should be brought to a screen showing your available partitions. Select your unformatted free space and click “+” to format your Ubuntu partition. If you already formatted the partition, you’ll want to reformat it as described below.
Note: If you only see your USB drive as an available device, then you probably need to change your SATA Operation configuration so that Ubuntu can find the hard drive. See the gotcha here.
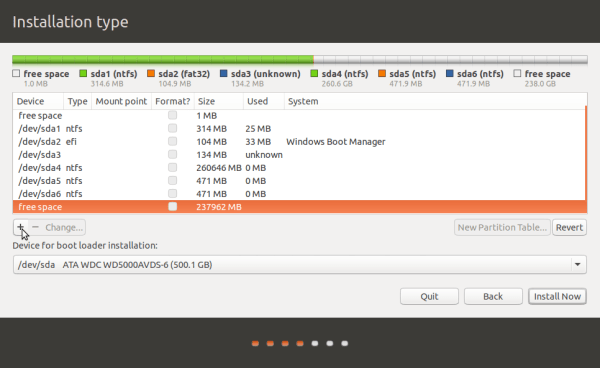
The device names were different on my installation. Only the external drive was named
/dev/sda, My hard drive partitions all began/dev/nvmebecause they use the NVMe SSD communication standard. -
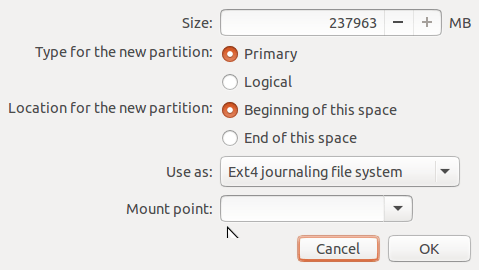
Select the size of your Ubuntu partition. This can be the full size of the reserved free space. Or you can choose to put your home partition in a separate partition (this guide shows how). If you want to create a SWAP partition (recommended if you have <4 GB of RAM) then reserve about double your RAM for the SWAP partition.
Define the partition as follows:
- Type for the new partition: Primary
- Location for the new partition: Beginning of this space
- Use as: Ext4 journaling file system
- Mount point: /
-
(optional) Create a SWAP space by selecting your leftover unallocated space and choosing the size as about double your total RAM. Define the partition as follows:
- Type for the new partition: Primary
- Location for the new partition: Beginning of this space
- Mount point: swap area

Note: You can instead choose to later create a swap space in Ubuntu 18.04, rather than a partition to handle SWAP.
-
Under “Device for boot loader installation” select your main hard drive. For me this was
/dev/nvme0n1. -
Select “Install Now” and confirm your changes.
-
The hard part is over, phew. Now you’ll be asked to specify your region, username, and password. The full installation should only take a few minutes!
D. Set Ubuntu as the first mount option
-
Shutdown the computer. You’ll be prompted to remove the USB startup disk media.
-
Restart the computer (without USB plugged in) and click F2 to enter the startup settings.
-
Change boot order (menu on top right) to list Ubuntu first.
- General > Boot Sequence: Ubuntu (listed first)
Note that it is possible Ubuntu is the only boot option listed. This is okay.
5. Get Windows booting again
Go ahead and restart the computer. You should enter the GRUB menu where you can select between Ubuntu and Windows Boot Manager to start Windows 10. Try booting Ubuntu and make sure it works as expected. Now try booting Windows.
Uh oh. We’ve run into our last gotcha:
Gotcha! When the SATA operating mode is set to AHCI not RAID On, Windows 10 won’t boot.
We need to get Windows 10 running in AHCI mode. (Unfortunately RAID is not supported for Ubuntu.) I found 2 methods here. I followed Option 1, which I’ll lay out below. It involves changing the Windows Storage Controller driver.
Update: According to these instructions it may be possible to load Windows 10 in AHCI mode without first changing the Storage Controller driver. Go directly to Step C. Restart Windows in Safe Mode and see if Windows repairs itself. If you are successful, please leave a comment! If not, follow the steps below.
A. Change the SATA operation mode back to RAID On
We need to get back into Windows 10 and change some settings.
-
Restart the computer and click F2 to enter the startup settings.
-
Switch SATA Operation setting:
-
System Configuration > SATA Operation: Switch from “AHCI” to “RAID On”
This should enable Windows 10 to boot again.
-
-
Apply changes and when the system reboots, select the Windows Boot Manager to launch Windows 10.
B. Change your Storage Controller driver
We need a driver that is compatible with AHCI. I followed the instructions here.
-
Log in to Windows 10 and open Device Manager.
-
Expand “Storage Controllers” and identify the Intel SATA RAID Controller.
-
Right click and view “Properties” of the controller.
-
On the Driver tab, click the “Update Driver” button.
-
Select “Browse my computer […]” then select “Let me pick […]”.
-
Uncheck “Show compatible hardware”.
-
Select “Microsoft” as manufacturer
-
Select “Microsoft Storage Spaces Controller”
-
Accept that Windows cannot confirm that this driver is compatible and save changes. Your Device Manager should now look like this:

-
Restart the computer and click F2 to enter the startup settings.
-
Switch SATA Operation setting:
-
System Configuration > SATA Operation: Switch from “RAID On” to “AHCI”
Take the opportunity now to also clean up some other settings we changed for the Ubuntu installation:
-
POST Behavior > Extend BIOS POST Time: Change back to “0 seconds”.
-
General > UEFI Boot Path Security: Select “Always, Except Internal HDD”.
-
-
If your lucky, Windows 10 will now load correctly. If you are unlucky like me…it won’t.
Gotcha! Windows 10 won’t reboot correctly after selecting new Storage Controller driver.
C. Restart in Windows 10 Safe Mode
If Windows 10 doesn’t start up correctly, you’ll need to enter Safe Mode to get the changes to take effect properly. I don’t know why. Perhaps life’s way of putting more grey hairs on our head.
-
Restart and select the Windows Boot Manager from GRUB. You will need to do this 3 times to trigger Windows 10 Automatic Repair. It will try to diagnose why Windows didn’t boot correctly and it will fail.
-
From the Automatic Repair view, select:
-
Troubleshoot > Advanced Options > See more recovery options (last option, at the bottom) > Startup Settings > Restart
-
-
When the computer restarts, select Windows Boot Manager from GRUB again.
-
Now a Startup Settings view should appear. Choose 4) Enable Safe Mode
-
Log-in in Safe Mode, then restart the computer.
-
Again choose Windows Boot Manager from the GRUB menu.
-
Windows should now boot normally. If it warns you that it had trouble before, just tell it to continue starting up normally.
And that’s it. Now both Windows 10 and Ubuntu 18.04 operating systems should launch correctly from GRUB. Which brings us to the last step…
6. Have a stiff drink
You did it! We did it! Yay us! Now have a drink, meditate, whatever you need to unwind from that mess of a rollercoaster. And please leave a comment regaling your triumph.
If you ran into (and solved) any other issues getting the dual boot working, please leave comments below for posterity to help others.
If you run into a problem and need help, this is not the place for it! I recommend posting to Ask Ubuntu. You can link to your question here if you like.
8 Replies to “Dual booting Windows 10 and Ubuntu 18.04 on a Dell XPS 13”
Great article but, sadly, the boot into Windows 10 in AHCI mode wasn’t straight forward. The best solution would be to boot into Windows (as in step 2) and shrink the partition to make space for the Ubuntu install (NB, you need to have 60GB free space in Windows to do an update apparently) but before you restart it, run Powershell as administrator and enter “bcdedit /set safeboot minimal”. Restart the computer and enter BIOS Setup. Change the SATA Operation mode to AHCI from either IDE or RAID. Save changes and exit Setup and Windows will automatically boot to Safe Mode. Run the PowerShell as admin again and this time enter “bcdedit /deletevalue safeboot”. Reboot once more and Windows will automatically start with AHCI drivers enabled. After that you can simply follow the steps in 4 to install Ubuntu in all that lovely space you have created! If you really want a nice experience in Ubuntu you might want to install Pantheon as your desktop as described by Lubos Rendek https://linuxconfig.org/how-to-install-pantheon-desktop-on-ubuntu-18-04-linux-desktop
This worked great, thanks!
A follow up question if I may: is there any way to re-enable Secure Boot?
Thank you so much. You saved me many hours of head-banging and hair tearing. The tutorial is very well written and easy to follow.
One point: the driver update for the Windows SATA controller did not work for me and I ended up having to reinstall Windows completely :(. I did follow these instructions and it seems to finally work:
https://www.tenforums.com/drivers-hardware/15006-attn-ssd-owners-enabling-ahci-mode-after-windows-10-installation.html
Thank you very much for this tutorial, it was extremely helpful.
(Some notes: I had trouble creating a recovery disk for Windows, so ended up making installation media instead. I luckily, and strangely, did not get the “ominous error,” despite not having modified the ISO. (I tried, but couldn’t find the relevant file – maybe this had been fixed?) In Step 5, I did skip to C as per the Update, and it worked exactly as described. Thank you particularly for the careful instructions there. My computer shipped with Windows in Japanese, which I do not speak, and I could not change it completely, so it was much easier to find the right path this way.) In short: thank you, thank you, thank you!! This guide made this potentially stressful process relatively straightforward.
Thank you very much for this thorough guide! I have just successfully installed Debian 10 on my fresh XPS13 with windows 10. Especially useful for me was the part 2.A (modification in Windows 10), part 3 (BIOS settings) and the gotchas. In step 5 I have followed the update and rebooted into Windows with AHCI. After couple of reboots I have triggered the safe mode (5.C.2) and the system recovered. Two small Debian related issues slowed me down unexpectedly: 1) wi-fi driver does not ship with Debian by default, but had to be added later and 2) touch pad was not working during Debian graphical install, however keyboard was sufficient.
went to step C directly (safe mode) and it works!
Thank you very much for this guide! I had followed similar steps from elsewhere to get Ubuntu set up, but came across the problem in Section 5 – I could no longer boot into Windows 10. As you suggested, I tried going straight to step 5C, without doing 5A and 5B, and this worked! So it is possible to load Windows 10 in AHCI mode without first changing the Storage Controller driver, by using the Safe Mode. Thanks again! 🙂
Thank you for your guide!